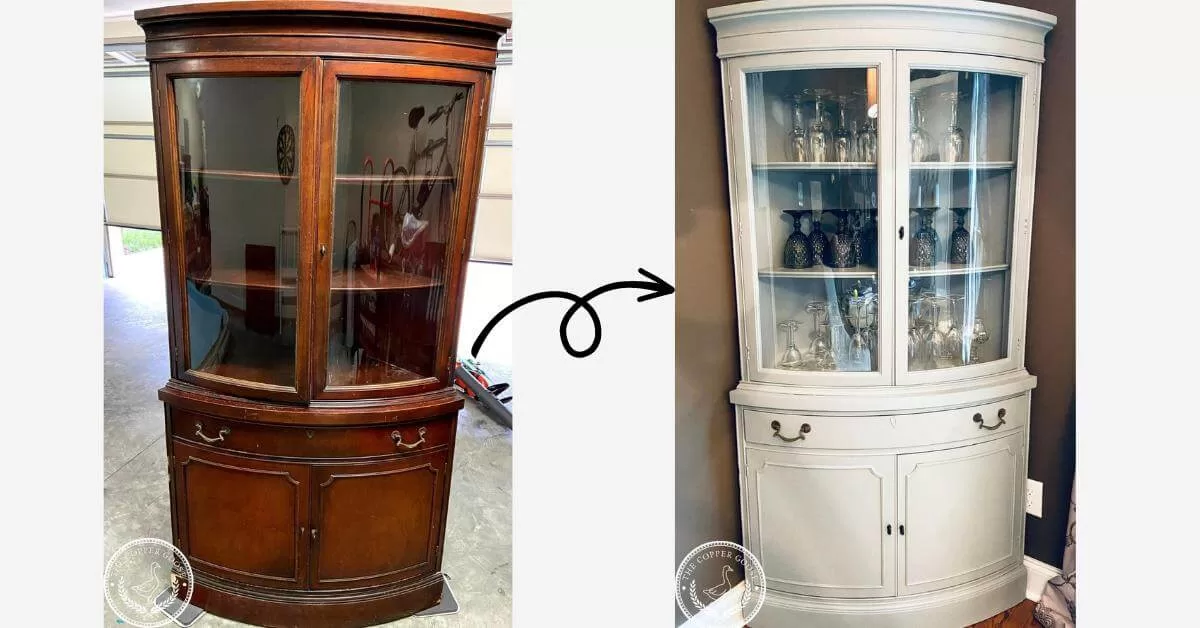
This scratched and mildewed corner hutch was easily transformed into a beautiful, functional storage piece in just a few hours using Good Bones Paint – no priming or sealing required! Check out the before-and-after…

YES, I PAINT STUFF…
Sometimes, the perfect piece just falls in your lap, and that’s what happened with this corner hutch. A family member gave me this cabinet because it was taking up space in storage and, “you paint stuff, right?”


Sure, it was scratched up, beginning to mildew, and had a chunk taken out of the bottom… But, I really needed some extra storage since I was expecting our first baby (who knew bottles, sippy cups, and baby plates could take up so many cabinets).
With a few hours of TLC, this corner hutch became my barware storage, with wine, sherry, champagne, and martini glasses displayed at the top and other bar accessories filling the bottom cabinets. The drawer made perfect storage for shot glasses, beer koozies, and bottle openers.
It freed up several cabinets and drawers in my kitchen and was easily accessible nearby in the dining room without taking up too much space since our farmhouse table is HUGE.
{I participate in affiliate programs, which may pay a small commission if a purchase is made after using an affiliate link, at no extra cost to the reader. As an Amazon Associate, I earn from qualifying purchases at no extra cost to you. See my full disclosure policy here.}
HOW TO PREP A CORNER HUTCH FOR PAINTING
The prep work was the hardest part of this project. The hutch had been stored in an old cabin without climate control, so there was some mildew beginning to form on the shelves. After disassembling the doors and shelves, I used a solution of diluted bleach water to scrub and sanitize. Then, I let it dry before moving on to the next step.


A word on Good Bones Paint: This isn’t a traditional chalk paint that requires a wax or polyurethane sealant. I find it resembles kitchen cabinet paint since it cures a hard finish. I’ve used it on a few pieces now and have been able to skip a primer and sealant each time. Pieces that have been painted nearly two years ago have held up without a sealant (however, I never paint tabletops or areas that would be more prone to scratches).
Anyway, a light sanding either with a sander or by hand is the only routine preparation I give to furniture before using Good Bones or any other cabinet paint. I use a dry cloth to wipe any sawdust, then go back over it with a damp one to remove any leftover specks.
A smooth, clean surface will make painting so much easier and give you a cleaner, professional finish!


TIPS ON PAINTING A CORNER HUTCH
Painting furniture isn’t rocket science, but there are a few tips and tricks that can make your DIY project less frustrating and give you a better finished project. This isn’t an exhaustive list of tips, but the ones I found relevant to this project.
- Use quality supplies and materials.
Your paint and brushes are the biggest investment, here.
I’ve tried several brands of paint and prefer Good Bones or other cabinet paints because they require fewer steps. They also cure to a harder finish than some chalk and milk paints.
As for brushes, I prefer these Purdy brushes– they leave the smoothest finish. These Purdy mini rollers are great for larger flat surfaces. If you happen to need or want to paint coats of sealant over your piece, I prefer a Polycrylic finish and this Purdy synthetic brush for those steps.
2. Read your paint’s instructions carefully, and note drying times as well as the cure time (paint that is dry but has not cured is still “soft” and prone to scratches). Cure times are usually a couple of weeks but vary based on the chemical makeup of the paint.
3. If you chose to sand your piece before painting, use fine-grit sandpaper. Also, work with a light hand! This corner hutch had some light scratches so I started with a 180-grit and went over it a second time with a 220-grit to blend the scratches out of the finish.
Some people chose to sand in between coats of paint but I didn’t have to with this high-quality paint and paintbrush combo. Both coats were smooth without extra sanding.
And always, always, always be weary of sanding off old paint, which could contain lead. You can find out more about lead paint, lead poisoning, and how to protect yourself from it at log on to https://www.epa.gov/lead
CORNER HUTCH BEFORE AND AFTER


Hopefully, this corner hutch transformation gives you some insight into how easy furniture makeovers can be with the right tools! I’ll be posting a more detailed guide on painting furniture where I break down additional steps like sanding, using wood filler, priming, and sealing.
If you’d like to read more on furniture makeover techniques in the meantime, take a look at this post on How to Paint Latex Furniture or this one on How to Stain Furniture.
