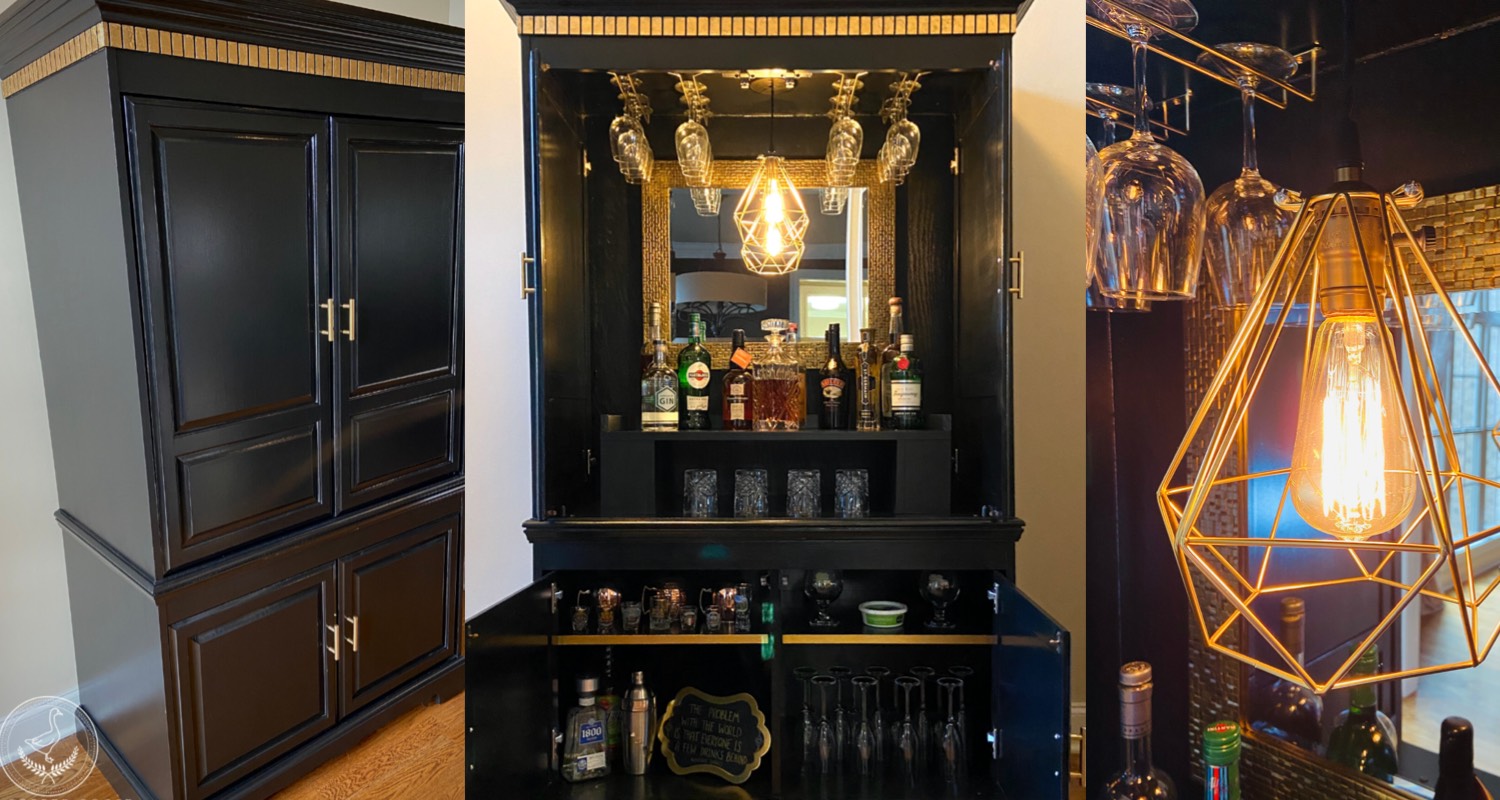
Do you have a piece of furniture that needs to be updated or repurposed? Check out this amazing transformation of a dated armoire into an Art Deco-style bar, complete with gold leaf details, a geometric swag light, and built-in storage for the cocktail connoisseur.
When I purchased this armoire for $6.00 (yes, ONLY $6.00 – crazy, right?), I knew I wanted to turn it into an “armoire bar.”
I dreamed of a glossy black bar with sharp gold accents, imitating my favorite Art Deco style from the Roaring ‘20s.
Unfortunately, I have a habit of taking on DIY projects that require more work than I originally anticipated. This was no exception! I put a lot of hours into this repurposing project, mainly due to my own errors and learning, but I was very proud of the result.

Let me walk you through my process, in case you want to give this upcycling project a shot!
{I participate in affiliate programs, which may pay a small commission if a purchase is made after using an affiliate link, at no extra cost to the reader. As an Amazon Associate, I earn from qualifying purchases at no extra cost to you. See my full disclosure policy here.}
Source List for Armoire Bar
- Zinsser Bullseye 1-2-3 Primer
- Purdy Nylox Sprig Nylon Flat 3-in Paint Brush
- Rustoleum’s Ultra Cover Premium Latex Paint
- Minwax Polycrylic Top Coat
- Gold-tone metal leaf
- Mod Podge
- Americana Décor Metallics Paint in 24K Gold
- Mountable wine racks
- Brushed gold-tone pulls
- Geometric swag light with edison bulb (I bought mine as two separate pieces but this one is already put together!)
Prepping the Armoire
Clean It
The first thing I do with any piece of furniture is to give it a good cleaning with my a damp cloth, and possibly a de-greaser if there are any dirty or over-polished areas. Fortunately, this bar was in great shape and already spick and span, so it only needed a light cleaning. I disassembled the doors and hardware and gave everything a good wipe-down.

Sand It
The next step was to sand and prime. I knew that I wanted to try out my stash of glossy black paint and would need to rough up the surface of the wood slightly so the paint would have something to stick to. I used a 120 -grit sanding sponge and went over the whole piece, inside and out. Sanding a piece for paint-prep requires only light pressure. I wiped off the dust and then began priming.
Prime It
Since I didn’t anticipate this piece to be a “bleeder” like some of the antique pieces I’ve done in the past, I stuck with 2 coats of Zinsser Bulls Eye 1-2-3- Primer. This primer comes in white or gray. I used gray with this piece since it would be getting a darker paint on top.

My tools of choice for both painting and priming the Purdy Nylox Sprig Nylon Flat 3-in Paint Brush and a Purdy Ultra Finish Mini Paint Roller. I’ve tried cheaper brushes and rollers and have found that these leave me with the fewest possible brush strokes.
Painting and Protecting
After priming, I used the same rollers and brushes (thoroughly cleaned, first) to add two coats of Rustoleum’s Ultra Cover Premium Latex Paint in “Gloss Black.” This gave the shiny, dark, modern look that I wanted, and would pair nicely with the metallic gold accents I would add later. This piece was painted inside and out (every nook and cranny!).
I didn’t use Floetrol to level my paint but didn’t notice too many brush strokes anyway. This was a latex paint designed for furniture so I felt it leveled out pretty well compared to chalk and milk paints, which tend to be a bit thicker and “chalky.” This is great for a lot of styles, but not what I was going for with this upcycling project.
Finally, I brushed on 2 coats of Minwax Polycrylic Protective Finish. Typically, latex paints are harder and more durable than chalk or milk paints and do not always need a topcoat, but I wanted to give the paint as much protection as possible, especially on surfaces that may have bottles or glasses sitting on them.
Using Gold Leaf and Gold Paint
This was my first attempt at using gold leaf on furniture. I guess the real term I should use is “metal leaf,” since I purchased this metal leaf at a craft store and it does not contain gold, but it was gold-toned. I used a small synthetic craft brush to apply a thin coat of Mod Podge to the rectangle pattern at the top of the piece. Each rectangle dried a bit until the glue was slightly tacky, then I gently applied pieces of gold leaf to the tacky areas. The gold leaf stuck and I was able to brush away the extra leaf with a blush brush. This type of brush was enough to remove the excess without scraping or scuffing the glued portions.
I worked in sections of about 8 or so rectangles so that they wouldn’t dry before I could leaf them. A few times, I missed adding glue to the corners and edges of the rectangle, and had to go back over it. The slightly wrinkled look of the leaf gave the pattern a great texture, and I was pleased with the end product.

Bottom: Sealing metal leaf with a protective coat.
I also used Americana Décor Metallics Paint in 24K Gold for some detail on the inside shelves. This was a similar color to the gold leaf, but without the texture. Both the metal leaf and the gold paint were sealed with a layer of Minwax Polycrylic.

Bottom: Gold leaf detail on at top of armoire.
Breaking Out the Saw
Ok, I really should have done this step before the priming, painting, and sealing steps but didn’t decide on it until the last minute. I didn’t like the idea of a big hole in the back of the armoire (cut out to fit a TV) and was not sure that my mirror would be supported well. So, I decided to reinforce the back by adding a layer of plywood. I did consider using MDF instead since it is smoother, however all of the MDF at my local hardware stores were much thicker. I didn’t want to add any weight to this already-enormous piece, so I went with the thinner plywood.
This required cutting the plywood to fit the top section, nailing and wood gluing it in place, then priming, painting, and sealing AGAIN. I wasn’t very excited to go through those steps again!

I also decided to add small extensions to the back, left, and right sides of the TV stand within the armoire, since I visualized this area to hold bottles and barware and didn’t want them sliding off the edge and breaking! This meant cutting MDF trim to fit 3 sides of the TV stand, gluing and clamping in place, and then nailing to secure. And of course, painting and sealing the added pieces.

From Dated to Art Deco
This was the fun part! I shopped for several hardware options and bar accessories to add some GLAM to this Art Deco bar. Here’s what I went with:
- A geometric pattern mirror, which originally was silver. I used the same Americana Décor 24K Gold Paint on the border to make it coordinate with the rest of the gold accents.
- Wine racks. I purchased these in a gold-tone to keep with the theme and spaced them out evenly before installing.
- Brushed gold-tone pulls. These were also purchased online, and thought they were much more “Deco” than the dated brass pulls that were original to the armoire.
- A swag light and geometric gold cage. This took a lot of thinking and a bit of extra work. I was very adamant about having a light that could be turned on inside the cabinet, by the actual bulb, however most swag lights are only operable from a switch near the plug-in end of the light. That didn’t make a lot of sense if you wanted to hide the cord behind the bar to keep it out of sight! I finally found one that was designed how I had envisioned, with a switch beside the bulb itself and another at the plug-end end. THIS LIGHT is very similar and comes with the swag light and the geometric cage as one unit!

Bottom Left: Brushed gold-toned hardware.
Bottom Right: Gold cage light with Edison bulb and gilded mirror in the background.
This one was cool – it came with an Edison bulb and had a built-in dimmer. I also purchased a geometric cage lantern (again, focusing on gold and sharp angles), and installed it by drilling a 2” hole through the top of the bar so that no cords would show on the inside. Since my light didn’t come with a canopy, I made one out of a plastic outlet cover (thanks to the guys at Lowes for the idea!).
The Final Product: An Art Deco Armoire Bar
The final step was to reassemble the doors and adjust the European hinges to align them as best I could. Finally, complete! This armoire bar was HUGE and had a ton of storage for wine glasses, barware, and bottles.


If you have any questions about this repurposed armoire bar or want to share your upcycling DIY projects, leave a comment below!
Want to see more repurposed projects? Check out this DIY chalk paint window and this vintage desk makeover!
For more content like this, subscribe to my email newsletter and join me on Instagram, Pinterest, and Facebook!


