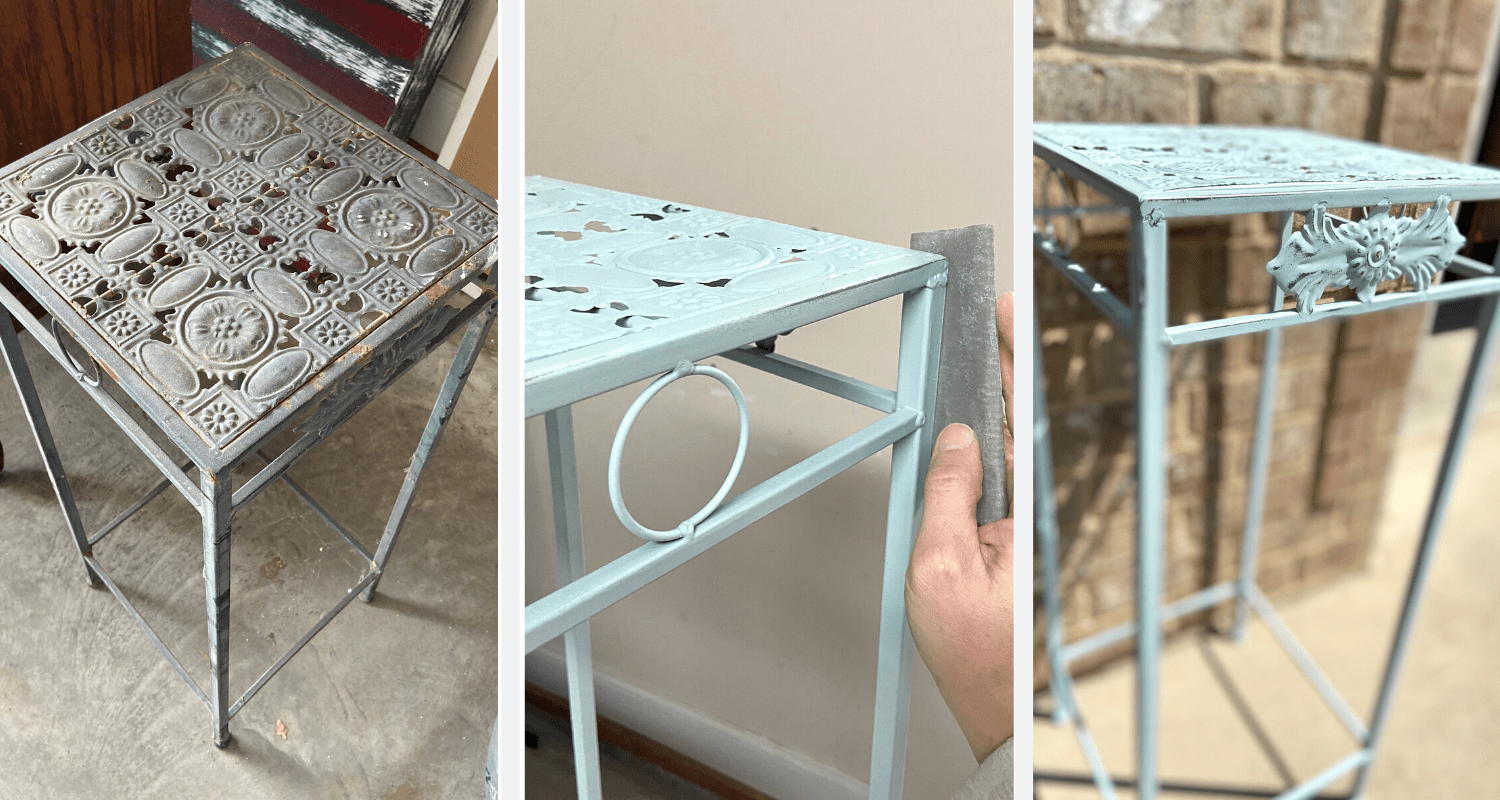
Chalk spray paint is even easier to use than traditional chalk paint and will cut your project time in half when used for pieces with legs or detailed surfaces – like this rusty old plant stand that was made over with Rust-Oleum’s sprayable chalk paint.
Here’s how to use chalk spray paint for any project piece in just a few easy steps!

Do you have a piece of furniture that needs a facelift? Well, I did….
This plant stand had been sitting in my garage for over a year, was covered in cobwebs, paint smudges, and rust spots. Eww…

Of course, I have trouble throwing things away that could potentially be useful. Luckily, the day I was cleaning out my garage, my dad called to ask me if I had a little table he could use on his back porch to set his coffee on. Oh, how he knows his hoarder-daughter and her furniture-collecting habits.
“As a matter of fact, I do!”
But first, a facelift – no father of mine is getting a rusty old plant stand for his back porch!
I could have taken a paintbrush to it, but painting things with legs, skinny segments, open surfaces, and details can get messy with a brush.
Sprayable chalk paint was an easy solution!
Here’s how I did it…
1. Clean Your Piece and Lightly Sand
A damp cloth is all it took to clean this plant stand. Even though most sprayable paints claim to adhere to any surface without sanding, I still like to sand to rough up the surface.

It also helped to smooth out the rough rust spots that had started to form on the plant stand.
SAFETY TIP: Remember that older painted pieces may contain lead that can be released into the air when sanded – be sure to follow proper safety precautions when dealing with lead paint.
2. Prep Your Painting Space
After your piece has been cleaned, make sure you have everything you need to get the painting portion done!
- Choose a space that is well ventilated. I was able to spray in my garage with fans and a plastic drop cloth but outdoors would also be great for maximum ventilation. A paint tent is also handy if you have one, but make sure it is still in a ventilated area.
- Use protective gear, including a face mask/respirator, disposable gloves, and protective eyewear.
- Have your paint and topcoat on hand, as well as some fine-grit sandpaper to smooth out any imperfections.

3. Spray Paint with Light, Even Coats
My paint of choice was Rust-Oleum “Chalked” ultra-matte spray paint in Serenity Blue. I loved this product because it had that chalky, matte finish just like traditional chalk paints but was ready to go with the push of a button!
Here are some tips for achieving the same look:
- Shake that can! You have to ensure that the paint is completely mixed before spraying or you’ll end up with a splotchy mess. Shake it for at least a solid minute and again for several seconds and again for a few seconds between sprays.
- Sprayable chalk paint is no different than regular spray paint in the sense that it has to be applied with light, even coats. Make sure you hold the can far enough away from the surface (10-12”) and move your arm in a sweeping motion from one side to the other, going past the end of the surface so you will avoid build-up on the edges.
- Change your angle of spray or turn the piece upside down to make sure you get all the nooks and crannies. This was especially important for my plant stand since there were so many details and metal cut-outs on the surface.
- Let each coat dry completely before spraying the next. Rust-Oleum’s sprayable chalk paint dries in only a few minutes but this could vary based on temperature and humidity.
- Sand down any imperfections. Even I had a couple spots where the paint had built up a bit too much – it’s an easy fix with fine-grit sandpaper to smooth down any bumps.

4. Seal with a Protective Topcoat
Whether your piece is wood, metal, or plastic, it needs a top coat to protect it from chipping and scratching.
Minwax Polycrylic Topcoat is my go-to sealer for many of my furniture makeovers, but it would have been a time-consuming MESS to seal this plant stand with a brush! Fortunately, Minwax makes the same product in a sprayable version!
- Wait for your paint to cure overnight before adding the topcoat. I know it’s tempting to do all the steps back-to-back but you never know how materials will react to each other if they mix too soon!
- If you want to distress your piece, do it before you add the topcoat. I lightly distressed my plant stand with 220-grit sandpaper just to give it a bit of a dimension. Wipe off all dust before sealing.

- Use the same methods with your sprayable topcoat as you did with your spray paint – shake that can thoroughly, spray light coats with a sweeping motion, and let each coat dry before moving on the next. I used 3 light coats on my plant stand.
DIY Updated Plant Stand with Sprayable Chalk Paint

Aside from letting the paint dry overnight, this DIY project only required around an hour of work! I was able to bring this plant stand out of the depths of my cobweb-infested garage and centerstage on my parents’ porch (and now my dad has the perfect spot for his coffee mug)!

Have you tried sprayable chalk paint? Tell me about your DIY projects in the comments below!
If you liked this simple DIY project, then check out this easy painted window upcycle as well! It’s a great way to repurpose vintage windows into customized wall art to fit any style!
For more furniture makeovers and vintage home style ideas, subscribe to my email newsletter and join me on Instagram, Pinterest, and Facebook!

