With times changing and more people working from their houses, home offices are becoming a “must.” My own home office was hideously unorganized and as “beige” as beige could possibly be until I finally decided to spruce it up. Here are 4 home office ideas I used to transform this room into a purposeful and stylish space that fits my personality!

HOME OFFICE: THE “BEFORE”
Problem #1: Beige…
…the archnemesis in my house. Sure, beige can be a great neutral backdrop to other décor but man, my house is FULL of it. There are three different shades of beige throughout my house (who needs 3 shades of beige??). It had to go!

Problem #2: No style or personality.
This room was a hodgepodge of budget furniture and hand-me-downs that weren’t cohesive in style. On the plus side, a colonial-style desk and fox-and-hound themed chair and prints had been handed down to us. This made for a great start to an Old English style office.
I love Old English style, by the way. So classic and charming!
Problem #3: Disorganized and messy
This of course was no fault of the room. I could have just tossed all the “stuff” that filled the bookshelves, desk, and closet in the current office – but I’ll admit, I’m a bit of a book hoarder. No minimalist home office here!

With my mind made up to keep the majority of my books and the necessity of a functional workspace, I decided that wall-to-wall shelves would do the trick.
FAVORITE PRODUCTS USED IN MY HOME OFFICE MAKEOVER
- Sherwin Williams “Dark Night” Showcase Interior Paint
- Minwax Wood Stain “Provincial”
- Forged Fleur-De-Lis Metal Bracket
- Faux Cowhide Rug
4 WAYS TO UPDATE A HOME OFFICE
1. Add Some Color
Now I’m not totally knocking beige – any neutral color can serve a purpose and become a beautiful backdrop to other elements in the room. But…. It’s just not for me. Not when there are hundreds of colors out there just waiting to be painted on my (or your) walls.

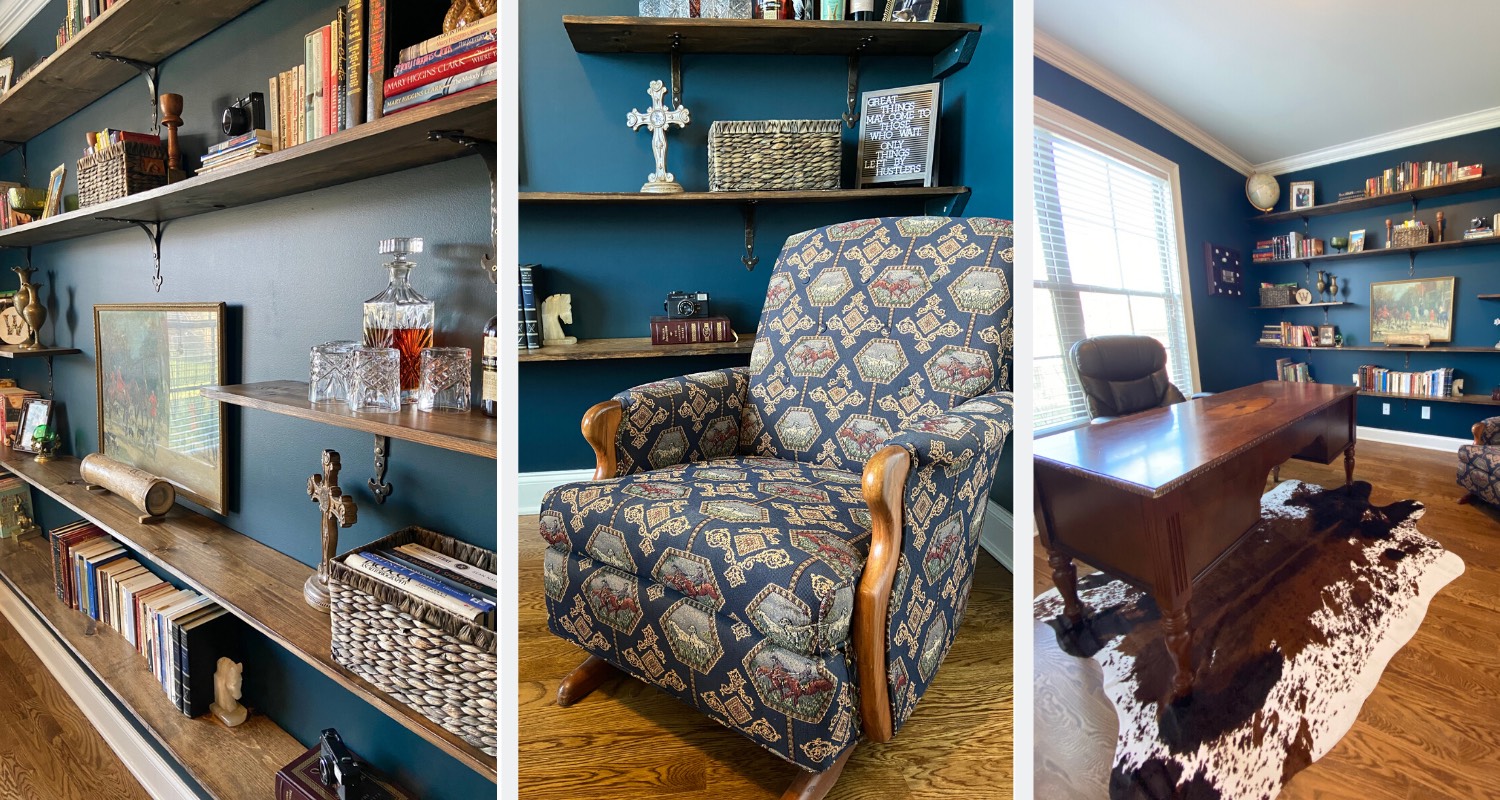
So, I went with navy blue. “Dark Night” by Sherwin Williams, to be exact. It was dark and rich with a hint of green undertones that gave it more of a deep midnight blue feel rather than a traditional navy blue. It tied in with the navy fox-and-hound fabric of our favorite vintage glider and would also serve as a perfect backdrop for all the bright, brass décor I planned to use in the room.
2. Make DIY Bookshelves
This part was fun! And by fun, I mean a learning process with hard work, a few missteps, but a great end-result.

There are lots of tutorials out there for floating shelves, but I liked the idea of seeing the brackets and hardware, since it would tie in with all the other metal elements I planned to use for décor.
These shelves were made from 12’ long 1×8 pine boards. Pine because I liked the grain and 1×8’s because I wanted them deep enough to hold books, baskets, and picture frames.

We also cut wooden braces to go on the left and right sides of each board to support the weight, since the brackets we chose were not heavy duty. You could probably skip the side bracing if you opted for heavy-duty brackets, but I was never able to find the style I wanted.
We went with these brackets from Hobby Lobby, which was a hammered bronze color.
3. Add Touches of Your Style
What’s your style? What elements can you add to bring out a certain theme? Personally, I love vintage and antique décor, especially old wood or metal pieces with a lot of texture.

Going with the Old English theme (remember, we already had a colonial-style desk, fox-and-hound glider, and several prints handed down from family), I accented with bronze and brass pieces, vintage picture frames, and quirky bookends.

A faux cowhide rug gave some interest to the floor and a small side table across the room served as a printer station (this was a DIY painted table, under $5). Because the room was already busy with everything on the shelves, I opted for no window treatments (even I know when too much is too much)!
For unique vintage items to add to your home decor, check out my online vintage shop!
4. Declutter and Organize
Now a lot of folks minimize what they put on their bookshelves.
In fact, bookshelves have become more of a way to style decor items rather than serve the purpose of storing books. This wasn’t an option for me, because I have SO. MANY. BOOKS.

However, I did “clean it up” a bit by removing the books I either didn’t like or had read and would never read again and used wicker baskets to house some of the books. Others, I lined up between eclectic bookends or stacked under nostalgic items like cameras and old ceramic pieces.

As for the clutter on the desk, I tried to utilize the actual storage drawers inside the desk instead of making piles on top of the desk. Now the hard part is making that last long-term!
That way, I only needed the top surface for the laptop and monitor.
HOME OFFICE: THE “AFTER”

So much better! My office is now brimming with personality – my personality. It’s a perfect representation of my favorite interior style: dark, cozy, and speckled with vintage touches.
What’s YOUR favorite style? How have you brought out that style in your home décor? Tell me about it in the comments below!
If you enjoyed this post on updating a home office, you may also want to check out this post on 6 ways to update your dining room set.
For more DIY project ideas and interior inspiration, subscribe to my email newsletter and join me on Instagram, Pinterest, and Facebook!


