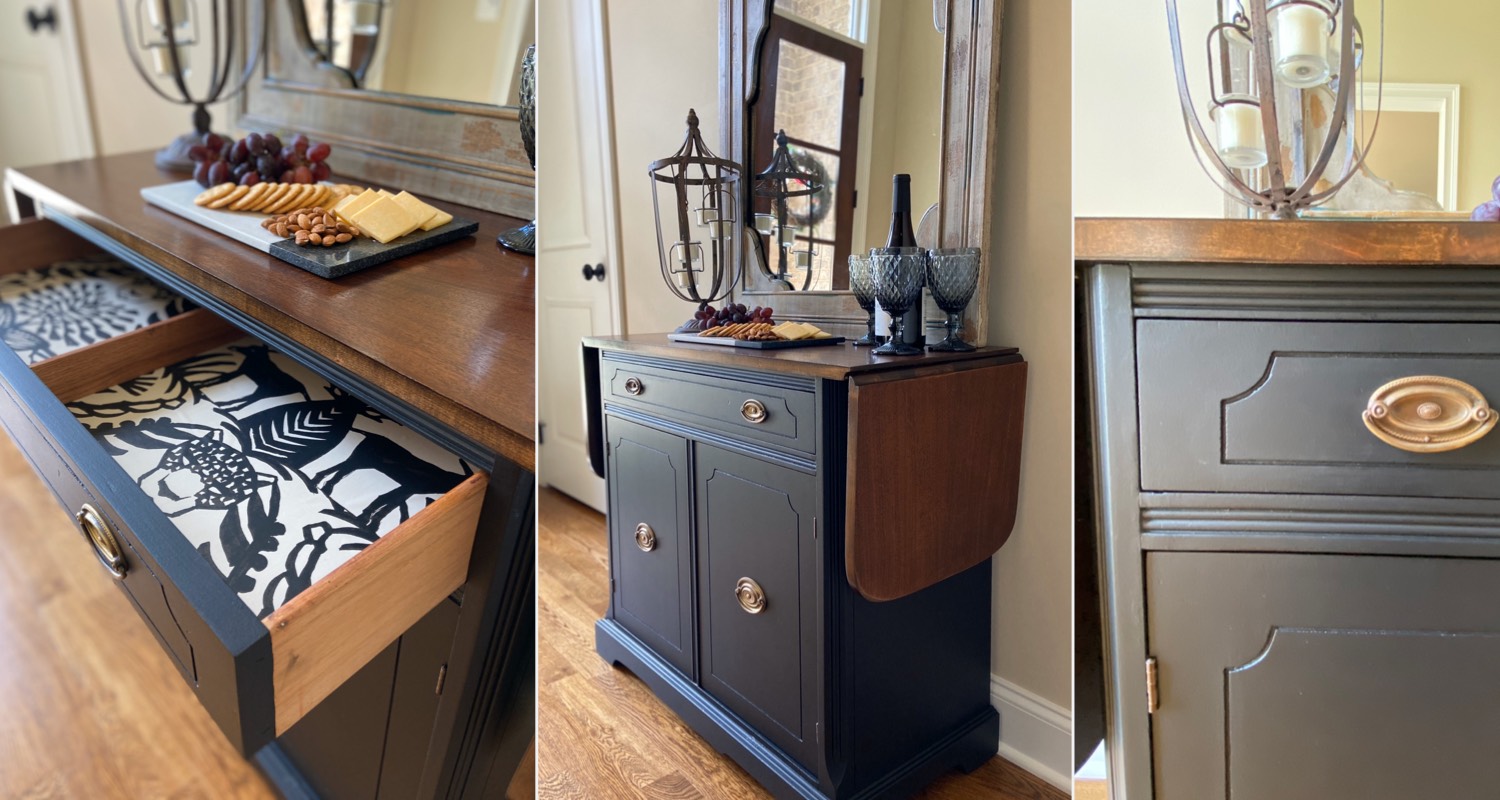
A “Flea Market Flip” is all about finding a great deal on an item that has the potential to transform into something amazing for cheap! I’ll walk you through the process of updating this fantastic find and give you a sneak peek into my costs and sales price.

I scored this vintage buffet for only $15! Yes, it was in rough condition – full of scratches and dents and the hardware was filthy. Despite this, the “bones” looked good and I knew it could easily be updated to a modern style.

SOURCE LIST
- 180 and 220-grit sandpaper, sanding block and/or electric sander
- Minwax High-Performance Wood Filler
- Zinsser BIN Bullseye 1-2-3 Primer, in gray
- Valspar “Project Perfect” Latex Enamel, in flat black
- Varathane Wood Stain, in ash
- Varathane Water-Based Polyurethane
- Small synthetic brush for painting corners and edges
- Foam brush, paintbrush, or cloth, for applying stain
- Purdy 3/8” Nap Mini Roller, for painting larger areas
- Purdy Nylox Synthetic Brush, for topcoat
- Jasco “Green” Odorless Mineral Spirits
- Removable wallpaper (I used Opalhouse Eulalia peel-and-stick wallpaper)
THE FLEA MARKET FLIP PROCESS
Here are the steps I took to update this buffet…
STEP 1: CLEAN AND DISASSEMBLE
My first step was to wipe this buffet down and take out the hardware. I also disassembled the drop-leaf sides and doors.
A lint-free rag and some mildly soapy water was enough to take the dust off.
STEP 2: FILL SCRATCHES AND HOLES WITH WOOD FILLER
This was my first time trying out Minwax High-Performance Wood Filler and I was very pleased with the results. I was able to patch a few scratches on the sides of the piece that were deep enough to show through the paint. After drying and sanding, the areas were perfectly smooth and ready to be painted.

STEP 3: SAND THE PIECE FOR A SMOOTH FINISH
I knew I wanted to paint the base of the piece a matte black, so I lightly sanded it with 220-grit sandpaper. This roughed the finish up enough to allow primer and paint to stick better, and it’s worth the extra 5 minutes to do this step rather than risk your paint peeling off down the road.
As for the top, I used an orbital sander to sand the finish completely off with 80-grit and then 120 and 180-grit sandpaper. I finished sanding by hand with 220-grit sandpaper. Sanding in stages like this will ensure a smooth finish and that your stain is soaked up evenly.
I wiped down the buffet again to remove all the dust before my next steps, and used mineral spirits for the top since I would eventually stain it.
STEP 4: PRIME AND PAINT
The base received two coats of BIN Zinsser 1-2-3- Primer and 2 coats of Valspar “Project Perfect” Durable Latex Enamel. The paint coating was hard and durable, which meant no topcoat (yay, for fewer steps!).

STEP 5: STAIN AND SEAL THE TOP
I followed the directions for my stain and achieved the shade I wanted in just one coat. The next day, I sealed the top with 4 thin coats of a water-based polyurethane. I recommend using a high-quality brush for any topcoat to avoid brush strokes!

STEP 6: LINE THE DRAWERS
This step was a little tedious! I measured the inside of the drawer sections then cut out slightly-larger sections of removable wallpaper. I peeled off the backing from the top half of the wallpaper section first, then pressed the sticky-side down starting with the middle and working my way up to the outer edge. This way, I could work in smaller sections and ensure no wrinkles.
I smoothed out the paper with a square layout tool (it’s what I had within reach) but you could also use a ruler, old gift card, or anything else flat and hard.

After the top half was smoothed down, I lifted up the bottom half, peeled the backing off, and again worked in a middle-to-outer-edge direction. Again, I smoothed out wrinkles as I went. After the entire section was pressed flat and smoothed, I cut away the excess with a razor blade.
This would have been a nice time to have 2 more hands, but I managed with only a couple of hiccups along the way!
STEP 7: CLEAN AND REASSEMBLE HARDWARE
Although dirty, the hardware was in great shape, so I cleaned it well with hot vinegar and a soft toothbrush and polished it back to a shiny finish.

VIOLA!
This drop-leaf buffet was back in business! If you factor out drying time, I spent approximately 4.5 hours to flip this piece.
FLEA MARKET FLIP EXPENSE BREAKDOWN
Here’s a breakdown of my expenses… For supplies that I had in bulk, I’ve done my best to approximate the amount of each that I used from the whole container (i.e. stain, paint, topcoat). This gives me an accurate view of how much in material costs I’ve actually spent.
Remember that since I paint regularly, I have a lot of reusable supplies already on hand like paintbrushes, drop cloths, and rollers.
Lastly, keep in mind that my paint, stain, and contact paper were all bought on clearance at discount stores, so I spent very little on these items (like 99-cent stains and $3.69 quarts of paint, none of which had defects). Check your clearance sections, people!
You can find my exact brands and sources at the beginning of the post.
Supply Cost:
- Mineral Spirits (approx. ¼ cup of a quart-container) – $0.66
- Wood Filler (approx. 1/16 of container) – $0.87
- Primer (approx. 1.5 cups from a gallon container) – $2.56
- Paint (approx. ½ of a quart container) – $1.80
- Sandpaper (2/3 of a pack of multi-grit sheets) – $5.23
- Stain (1/4 of an 8-ounce container) – $0.26
- Polyurethane (approx. ¼ of a quart container) – $4.36
- Removable Wallpaper (approximately ¼ of the roll) – $3.70
Total Supply Cost: $19.44
Furniture Cost: $15.00
Total Project Expenses: $34.44

FLEA MARKET FLIP: MY PROFIT
I list my flipped pieces on Facebook Marketplace and LetGo and have found these platforms to give me the best results. Within a couple weeks of listing this vintage buffet, it sold to a happy buyer for $200.
That means that I profited $165.56 after my expenses. Not bad for 4.5 hours of work (which doubles as podcast and audiobook time!).
If you enjoyed this furniture makeover process, check out this Vintage Typewriter Desk Makeover and this DIY Art Deco Armoire Bar.
Let me know in the comments below about your “flea market flips” and if you would like to see more content like this!

For more DIY ideas and furniture makeovers like this, subscribe to my email newsletter and join me on Instagram, Pinterest, and Facebook!

